Thursday, September 24, 2009

Another Gypsy giveaway!

Yet another site is giving away a Gypsy. So here's a quick post and a link. The site is Cricut Cartridge Helper, click the name for the link to the giveaway. And once again here is some info on the Gypsy and giveaway.

Cricut Gypsy

gypsy-palm

We have a contest going on until October 15th!

Win A Free Gypsy

The new Cricut Gypsy is a mobile scrapbooker’s dream come true – think of it as a full Cricut design studio right in the palm of your very own hands. Easy to hook up to the Cricut machine via a USB cable, the Cricut Gypsy is capable of storing up to 10,000 die cut designs from 4,000 cartridges. And the best part of all is the fact that you don’t even need a personal computer in order to start making professional quality die cut shapes, letters, symbols, and phrases for your scrapbooking or other crafting needs. All of the functionality of Cricut’s software is contained right here within this little handheld device.

gypsyzoom

Weighing just under a pound and measuring about 8” x 3” x 1.5”, the Cricut Gypsy fits right in the palm of your hand. You’ll have the ability to weld, resize, rotate, slant, stretch, and of course preview all of your designs beforehand so you won’t have to worry about time consuming and costly mistakes. The Gypsy is equipped with a 4.7” touch screen and a stylus pen to go along with it; and with a battery that is rated for up to 4 hours of continuous use or 12 hours of intermittent use, you’ll have plenty of time to finish any project you start.

But the Cricut Gypsy does even more than just store die cut designs. It can store all of your Cricut content, including overlays, user manuals, and projects; and everything is easily accessible either using buttons on the side or from using the stylus on the incredibly user-friendly touch screen interface. In fact, the Gypsy comes with 2 cartridges pre-loaded, so you can get started scrapbooking with your new Cricut Gypsy right away.

gypsycartridge

However, there is some concern over the functionality of the Cricut Gypsy. Some consumers believe that once a cartridge is loaded into the Gypsy that their cartridge will then be erased. For a community who is known for sharing ideas (and cartridges) this is simply unacceptable; thankfully Provo Craft has assured the public that this is not the case, and that your cartridges will not in fact be erased after the data is copied onto your Gypsy device.

By now it should be easy to see how the new Cricut Gypsy can make even the most complicated and difficult of scrapbooking tasks a breeze. By providing functionality like this in the palm of your very own hand, without the requirement of having to connect to a computer, Provo Craft really has the scrapbooking market nailed down with their newest release, the Cricut Gypsy. Never has it been this easy to make such beautiful die cut designs for scrapbooking or other crafts; and we have never before had the capability of making professional-looking projects without the use of a computer.

Wednesday, September 23, 2009

More fun with the Cricut

Who doesn't know a little boy or girl who thinks they are SUPER. I know quite a few. The Paper Dolls Dress Up Cricut cartridge has a wonderful scene you can create with just this theme in mind. It comes complete with a City skyline and a cool Super mobile. I gave my little super guy a gold Stickles emblem on his chest and a gold utility belt. He looks ready to fly away to me.

The completed layout includes a "Your Super" title and space for 3 photos. I added lots of little touches to make the page come to life. Some of the windows have lights on with gold Stickles and some are blacked out because no one is home. The Sun has a bit of gold Stickles for sparkle too.

This cute little Scare Crow goodie bag is off the Cricut message board, I did have to redo it so it just used Paper Dolls Dress Up and Platin School- George cartridges. But her idea was a great jumping point for me to make my own. I lost the thread or I'd give the link, so when I find it I'll come back and fix the post. I used two different Cuddle Bug folders to give him definition. I like using multiple products on a project. Makes me feel like I've spent my Scrappin' dollars well.

I love him. He's adorable. These projects will be part of the "Explore the Bug Zone" class at The Scrapbook Zone in October. Come join us for a fun Cricut filled class.

Friday, September 18, 2009

Giving Thanks!

This layout is for my "Explore the Bug Zone" class at The Scrapbook Zone. In October we will be playing with the Paper Doll Dressup cartridge. It has so many fun images on it I've had a ball being creative. This is the second item I've created using it, the first is still under construction and when you see it you'll know why. I'll get it finished next week and show tid-bits of it.

This layout I'm calling "Thanks". It showcases the cute little Indians featured on this cartridge. I decided to play with all the Indian images and create a little scene. The strip of patterned paper is where you would put your photos.

The little Indians were fun to make but a lot of piecing involved. This was a great way to use my scraps. I just had to buy the pattern paper and the 12x12 cardstock background. It's all about the embellishing here. The more detail you put into the characters the better they look.

I cut the headdress twice to get both colors and then just cut one apart and inked the edges. I added detail with a brown marker. On the girl I used a white gel pen on her dress and shoes. She is also pop dotted to make it look like she's standing in front of him. I added a little Stickles on the pots and pop dotted the front one.

For the Tee Pee I cut it twice and cut one apart to add the red middle section. When putting it on the layout I pop dotted the door sides to make it look 3-D. I hide the turkey behind the corn, he's afraid of being dinner. The corn still needs some yellow Stickles but I didn't have any and I had already been to The Zone today, so it will have to wait till Monday.

I might still add a little shadowing on the ground so the images don't look like they are floating. But over all I'm very pleased with how this turned out. For complete instructions you'll have to visit The Scrapbook Zone and take the class.

A little Boo Baggage

Who wouldn't like to get a "Trick or Treat" gift in this spooky bag? I Used the Cricut Tags-Bags-Boxes and More cartridge. A Halloween stamp with some great legs and a bit of Stickles in a witchy green. Filled with candy it would look great on someones desk.

The second one was this cute little purse with a black ribbon handle. A line on pumpkins in the bottom and a Spidery "BOO" make this purse a sure hit. I used the green Stickles on the pumpkin stems for a little sparkle. It's filled with "treats" and ready to give.

Dig out that TBBM cartridge and have fun with these Halloween treat bags.

Wednesday, September 16, 2009

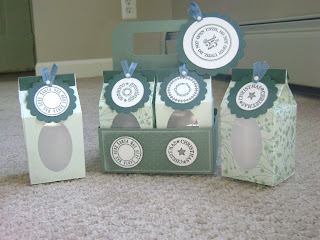
Milkcartons and Carrier

I'd like to start this post by thanking Cindy Cassell from the Cricut Message Board for sharing her design. She made this file for the Cricut Design Studio using the George cartridge. You can find the file here.

And this is what I played with yesterday and today.


This was my test cut. I found some old stack cardstock from JoAnn's and loaded the Cricut. I wouldn't recommend this paper for this project. It's brittle and when scored and folded tended to tear. But for a test project it was fine. I'd also recommend some really sticky tape to hold the sides together. Tombo mono adhesive didn't quite cut the mustard.

I wanted to make a Christmas one to showcase in our Cricut Christmas Class. I'll direct people to Cindy's blog to get the file but see what creative things you can make with your Cricut.


I adapted the file by adding the window on the front. I use a piece of plastic I cut off my new Cricut cartridge packaging to make the window and now when I fill it with candy it won't fall out.

I used my stash to make this project. The paper is Basic Grey from an old line I'd bought in a pack on clearance. It had two of each paper, so two styles of cartons. I even had cardstock to match. I used a Christmas sentiment set (Art Warehouse) I'd bought at the Scrapbook Zone last winter to finish of my tags. I can't thank Cindy enough for sharing her file. She even supplied the scallop tags in two sizes.

I know I'll be making a bunch of Christmas things this year with my Cricut, how about you?

Tuesday, September 15, 2009

New Blog to check out.

Today I'd like to gie you some info on a new blog. It's mission is to explore all things die cuttable and give us the latest information in the Scrapbooking world. It's name you ask: Cutting Above. Provo Craft is a sponsor for this site and has given them not 1 but 2 Gypsy's to give away. What's the Gypsy you ask? Here's some basic information on the Gypsy straight from the Cutting Above site.

Provo Craft and HSN will launch the Gypsy on September 24th starting at 12 AM

Have you heard all about the Gypsy and what it can do? Wow . . what a kewl machine. If you haven't heard about it yet, let me run down just a few of the advantage to owning this fascinating tool:

  1. provocraft-uses2 Portability . . you can use it anywhere
  2. Your cartridge library is now at your fingertips! This is great for scrapbook getaways and crops!
  3. Hand held device is lightweight at 11 oz.
  4. Ability to store up to 7000 cartridges!!
  5. Comes with 2 full cartridges preloaded (sweeeeet!)
  6. You can now view all your images without being tied to a manual or keypad
  7. Perform a keyword search on all your cartridge images . . even for ones that you haven't uploaded. This is great for cartridge research and planning for that next purchase
  8. Allows you to create templates when designing
  9. Comes with a 12 month warranty from date of purchase
  10. Ability to JAZ up your Gypsy with silicon skins, screen protectors and colored styluses
These are just some of the advantages of purchasing the Gypsy. To read more about this innovative new product and to even take the device for a test drive, visit the Provo Craft Gypsy web site.

It's going to be interesting. I want to see one in person before I make a call on if I really want to spend the money on this little gadget.

Head on over and check out Cutting Above. It's well worth bookmarking.

Friday, September 11, 2009

Little Hockey Players!

How about a little Cricut help? I had some today. Roped my Niece Samantha into helping me with a little project today. Knew it was going to be a big job so we moved to the dining room table.

Here's a team of hockey players just waiting to be dressed. They still need helmets, gloves and emblems on their jerseys.
This would be the debris pile after making 18 Paper Doll Hockey players.

All dressed and ready to play. A bit of silver ink on their skate blades gave them a shine. I'm loving the face masks. The team emblem is a red Maple Leaf. They have sticks and pucks, we're ready to play.

A few close up shots of the players.

All skin tones were represented as well as different hair styles.

Some players are right handed and some left.
Tomorrow I'll take a picture of the finished center piece. It's going to be a hit at our getting to know you hockey gathering tomorrow.

Wednesday, September 9, 2009

One Messy room!

OK this is what happens when I'm in the middle of a great project. My scrap room looks like a bomb went off. A bomb full of paper scraps, adhesives, paper cutters and Cricut parts. I actually had to put my Cricut on the ironing board because I needed to use the 24 inch mat and it needed space to run thru the machine. Instant Cricut table just remove iron.

This is the major component of my project. A wickedly evil looking tree, complete with spider web. Someday I'll take a photo without all the crap in the background. Now I'm not showing all the parts and pieces today. Nor am I telling you what the finished product will be. All I'm going to say is your going to want to visit The Scrapbook Zone in October and take the Explore the Bug Zone class.

Here's another little piece of the puzzle. A cute little black cat and a creepy spider. Both made with the Cricut and a white marker. The "googlie" eye's are my new favorite. It makes them look store bought and not home made.

Monday, September 7, 2009

Beware escaped Monkey's

Well it was a rough weekend. I worked Friday, Saturday and Sunday so I just had to treat myself. Yep I couldn't resist. The price was right and they were in stock. So Friday night after work I took myself to Micheal's and bought the new Every Day Paper Dolls cartridge for my Cricut. Took it out to show Katie when we got to work on Saturday and then we just had to play with it.

So we started with some Reminisce jungle print paper, added some cardstock, cut it all up and then.....


Added a herd of Elephants, a few Giraffes, we let the monkeys escape but the Zoo Keepers rounded them up again. We embellished all the pieces: some with Stickles, some with metallic creme chalks, and some with ink and markers. Let the fun begin.


We created this really cute Zoo layout. Pop dotted a few elements for added depth and took a good look to see if it was done. It was missing something. Now I see it. The figures look like they are floating. So we added grass to ground them. Yes much better.


We built 6 of these layouts. Every customer that passed through the store on Sunday commented on them. I probably could have sold all 6 if I'd had them done and priced. Told them all they'd have to wait till Tuesday. Sorry. We might end up making more of these little cuties.

Saturday, September 5, 2009

Criuct Explorers!

Meet today's Cricutteers. We had such a good time this morning at The Scrapbook Zone. We played with the "Graphically Speaking" cartridge and glass etching creme. I had seven wonderful students in the class with me. Everyone picked a title for their frame and then we were off and Etching.


Some how, Jackie and Mary skipped out before having their photo taken, but I did capture their projects before they left. Many thanks to Marie, Terri, Pat Blanca, Maureen, Jackie and Mary for getting up early this morning and taking a "Graphically Speaking" adventure with me. Thank You ladies!

Friday, September 4, 2009

Cricut crazy day.

So I spent my day at work, trying to prep for the Graphically Speaking Explore the Bug Zone class. I decided we are making this layout and doing the glass etching 9x9 picture frame. So I needed to kit up 6 layouts. I picked a pretty paper loaded the cartridge, adjusted my settings for pattern paper and hit "Cut". Do you think things went smoothly for me today? Well let me tell you they did not.


This little ABC frame was just a bugger today. I kept getting little pockets of crunched up paper near the n's. And then the corner would tear when I tried to take it off the mat. Now I can't expect people to just go with the flow here and glue the torn pieces back into place. Nope I'd hear about it for sure, so I ended up cutting like 10 of these to get 6 good ones. I tried changing the blade, adjusting the blade height on the housing, messing around with the pressure and speed. In the end I think I figured it out, but my gosh did I need to go through all that.

We had Freaky Friday at the store today and we were busy! So Sheri and I ran around like crazy but got everything done. Boy was I glad to see Sue at 5:30. Bye Bye Scrapbook Zone I'm off for the night. Too bad I'm right back there bright and early Saturday morning. Lets pray the Cricut gods are smiling on me tomorrow and every thing goes smoothly for my class.

Wednesday, September 2, 2009

Ikea and Etch All

So what do you get when you combine Ikea and Etch All? A really fun home decor project using my Cricut and the Graphically Speaking cartridge. I won't keep you in suspense any longer here it is:


Now I realize everyone may not wish to use this title, so for class you will be able to pick you title and really personalize the project to fit your needs.

The first thing you need to have for glass etching is a wonderful product called Etch All, etching creme. It works on glass and mirrors. You also need adhesive vinyl.

After I picked and sized my title I cut it out of this lovely pink Quickutz vinyl. Why Quickutz vinyl you ask? Well it's what we had lots of in the store, so it's what I choose. The last time I etched I used Cricut vinyl, is there a difference? Not sure but I think the Cricut vinyl may be stickier. Is that a word? The QK vinyl shifted a bit when I was wiping the creme off so I had to work fast. You also want to make sure you have no air bubbles along your edges. If you do you won't have nice crisp lines.

When the vinyl is ready you just gob on lots of etching creme using a foam brush. Let it sit for 15 minutes, wipe off excess and return it to the jar, the rinse off the remaining creme under warm water and dry the glass.

Up close this is what you get. I cute title etched into your glass. It will be really simple to remove the layout and and change it. I'll just have to remember to keep the title in the same space as a design element in the future.

This will make really wonderful personalized Christmas gifts for Grandparents. And then each year you can easily change it out as the children grow. The frames are called "Clips" and are available at Ikea for $2.99 (apkg of 2). Quite inexpensive I think.

Now I did not use transfer paper but it's something I can see would be very useful, so I have a feeling it's coming out of the tube on Friday when I'm at work. I can use it for Saturday's class and make my life easier. Plus it may sell the transfer paper.
If you have a question on how this works please feel free to leave a comment and I'll answer the best I can.